Showing posts with label Crafty Creations. Show all posts

Wednesday, June 23, 2010

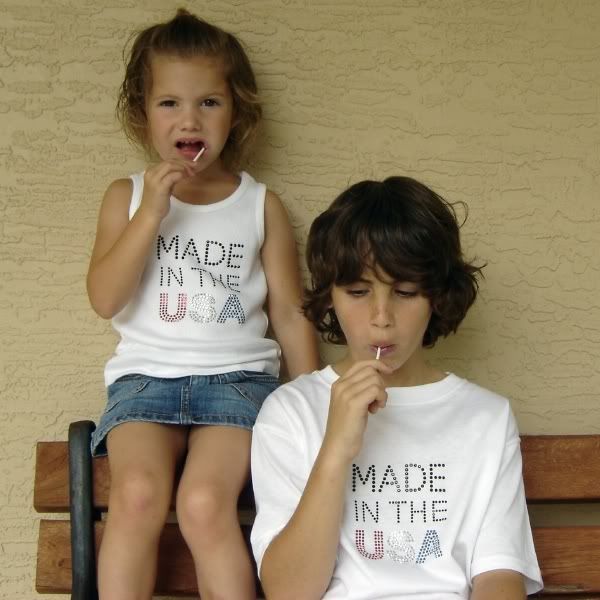
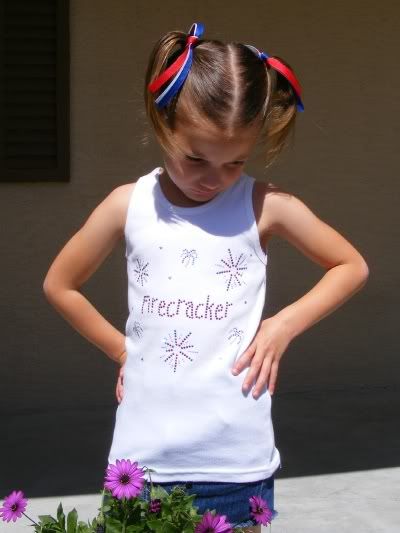
20% off Patriotic Bling Tee's

BIN get it in time for the 4th of July

Custom Firecracker Bling T

Custom MADE in the USA Bling T for Boys and Girls

You can find these shirts & more in my etsy shop, eBay and my website.

~Patricia

Tuesday, June 15, 2010

Painted Shirt - Freezer Paper Stencil Tutorial

Freezer Paper Stencils are a quick and easy craft for the whole family.
You may already have many of the supplies around the house.

Supply List:
printer or pencil to draw your own design
freezer paper
material or shirt
Xacto knife
cutting mat
iron or heat press
fabric paint
stipple or spouncer paint brush
tapered foam brush
tweezers

Step 1
Freezer Paper Stencil step 1

Cut the freezer paper to size. It will need to be larger than the design to avoid getting paint outside the intended design area.
Draw or Print directly onto the freezer paper.
If printing be sure to print on the non-wax side of the paper.
Also, text does Not need to be in mirror image. How you see the design on the freezer paper is exactly how it will look on the material.

Step 2
Freezer Paper Stencil step 2

Using a sharp Xacto knife, cut the design out of the freezer paper.

Time Saving Tip: If you plan to make multiples of the same design, stack and tape additional blank freezer sheets under the printed design and cut all at once.

Step 3
Freezer Paper Stencil step 3

Lay out the design on the material, shinny side down.
Follow the heating instructions on the freezer paper box to apply the design to the material.

Freezer Paper Stencil step 4

All the designs I made had elements within that I did not want painted.
Using the pieces cut out of the freezer paper, place and iron where desired.

Freezer Paper Stencil step  4-1

Step 5
Freezer Paper Stencil step 5

Gather your painting supplies.
Above is a picture of a Spouncer Sponge and a Stipple Brush.
I prefer to apply paint with a Spouncer because I feel it is less likely to cause the paint to bleed under the edge of the paper. But I have used both...
use what you have on hand or what you prefer.

Freezer Paper Stencil step 6

Above is the Jacquard Lumiere Metallic Silver paint I used
and a tapered foam brush.
Note: I did not use the regular bristle paint brush in this project.

Prior to applying the paint put a sheet of freezer paper between the layers of the material to prevent bleed through.

Now your ready to paint!
First use the spouncer/stipple brush.
Dip the brush into the paint.
When stippling it is important not to use too much paint. You do not want the brush dripping.
If needed tap the brush on a paper towel to remove excess paint.

To stipple: use light pressure dabbing the brush up and down on the surface of the material.
Apply one thin, even layer of paint.
Allow to dry to the touch and apply additional coats until desired effect is reached.

Freezer Paper Stencil step 7

After I apply my last coat with the stipple method, I gently sweep a tapered foam brush over the design in one direction. I feel it creates a smooth even finish.

Step 6
Freezer Paper Stencil step 8

Allow paint to dry completely.

Step 7
Freezer Paper Stencil step 9

Remove stencil.
For tough areas use pointed craft tweezers to gently scrape the paper off.

Freezer Paper Stencil step 10

Step 8 (optional)
Some fabric paint requires heat setting to allow for the item to be washed, others do not.
Read the instructions that came with your fabric paint.

The Jacquard I used does require heat setting.
Per the manufacturers instructions:
Air dry for 24 hours, heat set by ironing both sides for 30 seconds at temperature suited to fabric. After heat set, colors are washable or drycleanable.

Here's your completed shirt

Freezer Paper Stencil completed shirt

For more freezer stencil shirt ideas, visit my Flickr account.

~Patricia
Friday, April 23, 2010

New Painted Tee

Here's another for the Boys Painted T collection

guitar skull shirt

These shirts are so much fun to make! I snapped a bunch of pic's..tutorial coming :)

~Patricia

Wednesday, March 31, 2010

New - Boys Painted Tees

One Boy One Girl Boutique's new line of Boys Painted Tees were such a hit when they debuted at the Easter Market.

I haven't had a chance to list custom painted tees on my website or the ready to ship ones on etsy, as of yet.

You can see all the tees I featured at Market in my Flickr account.

Here's a sample of a few

robot
monster truck
silver tie star
black tie skull
black guitar star

~Patricia

Wednesday, July 15, 2009

The Cats Meow ~ Bling T

Kitty Cat Bling Tee Listed on eBay for the
BCheeky Teacher’s Pet Launch


I've teamed up with
sweettreatboutique and fish*hook*crochet
To bring you a fun outfit,
perfect for the entire school year!
Search BCheeky on eBay for the coordinating items and more!

~Patricia

Saturday, July 11, 2009

Bloomin Bling

The eBay design group The Fairy Godmothers
has invited One Boy One Girl Boutique
to take part in their Tickled Pink guest launch.


Pick yourself some Bloomin Bling on eBay


~Patricia

Monday, April 27, 2009

Patriotic Bling Tees

Currently Listed on eBay
(will be uploaded to the OBOGB website next week)

Do you know a little girl that is
Fun, Spirited and Independent ;)

Let your little Firecracker show her Patriotism with this Sparkly Bling Tee

Back my popular demand...
Made in the USA Bling Tee
(on the website and at auction)

So cute for a Boy or Girl!
~Patricia

Wednesday, April 22, 2009

Upcycle ~ T-Shirt Bag

Earth Day Upcycle Craft

How to make a Bag from an old T-Shirt

I chose an old dingy shirt that does not fit my son anymore.

Lay the shirt out flat, seams together
Cut the sleeves off using a rotary cutter or scissors
Depending on the size of your shirt cut a 7-8 inch circle around the neck
I used this helpful circle cut ruler but you could also lay a large bowl on the shirt to use as a guide.

Turn the shirt inside out, pin along the hem
Sew the bottom of the shirt closed...I went back over it a second time to reinforce the stitch.

Turn right side out.


You're done!

It was so quick and easy I made one for my daughter ;)
~Patricia

Saturday, April 18, 2009

Princess Jasmine Bling Tee

"Wonderful! Magnificent! Glorious!… "
is what the Genie in the Aladdin calls Princess Jasmine
and she's just that on this Shinny Bling Tee


I just listed this brand new design in an eBay Auction

Bid Now to get one for your Princess Fan or
for your visit to the Most Magical Place on Earth!

~Patricia

Monday, March 23, 2009

Retro Toys with BLB Boutique


The eBay design group
BLB Boutique
is hosting a guest launch and the theme is
Retro Toys
Nearly a 100 fabulous Boutique designers have come together to create fun outfits & accessories featuring all your childhood favorites
Gumby, Smurfs, Paper Dolls, Raggedy Ann and More

For the launch I've listed my
Hello Kitty Bling T
and the auction is starting at a low price
So jump on in and Bid!

Hello Kitty Auction

Next up is another of my favorites
Strawberry Shortcake
it's also starting at a fantastic price for a design with over 500 Rhinestuds!
All hand placed by me


Strawberry Shortcake Auction

By the end of the week both of these character shirts will be listed on my website with Buy It Now prices

Search "BLB Boutique" to find more Retro Toy fun and
These fabulous coordinating Strawberry items
Skirt & Dress available in separate listings by RMXdesigns


~Patricia

Monday, March 2, 2009

Sweet Bunnies

Here's my last one for the Mad Hatter's Tea Party launch with
BCheeky on eBay.

A Bling Tee with 3 Sweet Bunnies perfect for Easter or Any Day.
One in Bright Yellow, Dark Sky Blue and Pink ~Yummy
The design will be recreated for you using 270+ Shinny Faceted Rhinestuds
on the custom sized tee of your choice.


Hop on over before their gone

~Patricia

Saturday, February 21, 2009

Mad Hatter's Tea Party

Just Listed on eBay
for the BCheeky debut launch
Mad Hatter’s Tea Party

Alice in Wonderland was one of my favorite stories as a child.
This custom Alice bling tee is my tribute to the classic book.
Alice's curious face was created by hand with 500+ shinny metal faceted rhinestuds.
The design will be recreated for you on the custom sized tee of your choice.

Alice Bling Tee


Alice Tee Auction Listing
Free Shipping within the US for the Auction Winner!
~Patricia

Saturday, January 17, 2009

Andalucia Fabric and Mommy & Me Apron debut

eBay designers have come together to celebrate one of our own.
Patty Young of Modkid Boutique is the designer behind the Classy & Whimsical new fabric line Andalucia for Michael Miller.

The fabric worked perfectly to make matching Mommy & Me aprons.
I think both mom's and little girls will find something to like about the fabric design.

Besides honoring the new Andalucia fabric line this is also the online debut of my Mommy & Me Retro Flare Apron sets.
I have been selling these adorable mother daughter apron sets at craft fairs throughout Florida.
They sell out as soon as I make them so I haven't had a chance to list any on my website.

I have several cut out, ready to sew...with no Craft Fair's lined up for a couple months I should be able to get a few listed.

Here is the Mommy & Me Andalucia apron set
It is Ready to Ship and listed on eBay

Isabella & I even did a little modeling !

To find all the fabulous items listed for the Andalucia launch
search "Boutique Andalucia" on eBay

~Patricia

Monday, December 8, 2008

Christmas Trees and Pom poms

Make your own Christmas Tree
I have been eyeing these porch/entryway Christmas trees that I have been seeing at stores, for a while.
I've seen them in many sizes, with or without decorations and typically they range in price from $30-100.00+
I don't have much of a budget for holiday decorations this year, so I made my own.

I started with an empty flower pot and a tomato cage.
You can place the tomato cage upside down over the pot, like I did below

or if your pot is large enough you can place it in it

I used 3 9ft sections on 2ply pine garland that can be purchased for $3.99 each.
Wrap each section of garland around the tree and position the branches to fill in the empty spaces. It won't cover perfectly but trust me it will look fantastic when your done.

After the pine garland was in place, I wrapped a string of white lights around it and Bella added the faux poinsettia to make the tree look festive during the day.

The tree looked awesome all lit up tonight.
After I make another I will post more pictures.


While at a holiday home tour I saw similar trees wrapped in moss and decorated with fruit.
One used only green apples, it looked beautiful.

Pompoms
Bella has jumped on the Pom pom Garland craze.
This was an easy craft that she really enjoyed

She loved the fact that she could do it all by herself and it didn't take long.

Looks great on her and

on her very own Christmas tree!

Felt Ornaments
Here's a sneak peak at a felt ornament I made

I am working on a couple other designs based on cookie cutter shapes.
When I'm done I will post my patterns so you can make your own.
Happy Decorating!
~Patricia

Tuesday, December 2, 2008

Ornament Crafts

While decorating the Christmas tree this past weekend I came across ornaments we have made over the years that are great kid crafting projects.
The first 2 are pipe cleaner ornaments.
Here's an easy candy cane that kids of all ages can make. We have them in several colors and sizes on the tree.

The snowflake may be better suited for older kids or the help from mom or dad to cut small pieces of pipe cleaners.
We had also made a wreath but I can't find it. If I make a new one I'll post a pic.

Trenton (10) and I made adorable reindeer ornaments when he was 3.
What a nice memory on our tree, we even have mommy and daddy reindeer hands...I think it's time Isabella made one ;)

Isabella did make this Popsicle ornament, there are also a few decorated with sparkles.

I made this gingerbread man garland several years ago along with a snowman set for my sister.


Here's the recipe for the garland
3 cups all purpose flour
1 cup salt
1 cup water

Decorations:
Food Coloring, Glitter or Acrylic Paints

To make the dough, combine the flour, salt, and water in a mixing bowl.
Knead the dough until smooth and rubbery.

You can roll out the dough and use cookie cutters to make your shapes.
If you will be making the shapes for garland use a straw to make holes for the ribbon.

Bake at 275 degrees for 1 hour.

Paint the ornaments after they have cooled completely.

Happy Christmas Crafting!
~Patricia